The K2 Plus 3D printer’s Cutting-edge Filament System (CFS) provides an efficient solution for seamless filament management. Whether you’re loading, unloading, or replacing filament, understanding each step in detail helps maintain print quality and minimizes downtime.
This guide covers each process thoroughly, with tips to optimize usage for 3D printing enthusiasts and professionals.
- 16 COLORS TO ENHANCE YOUR CREATIVITY: The Creality Filament System (CFS) has a connection hub on the…
- SNAPSHOT SUPPORT IS ENABLED: the CFS is able to provide model support in different materials. It can…
- AUTOMATIC FILAMENT MAPPING: The CFS is programmed to communicate seamlessly using Creality 3D…
- AUTOMATIC FILAMENT SWITCHING AND RELAYS: The CFS is able to switch filaments smoothly and accurately…
- AUTOMATIC RUNOUT/TANGLE DETECTION: Sensors are used to monitor each filament reel. It will pause and…
Why Effective Filament Management Matters
A smooth filament management process is vital to achieving consistent print quality, reducing material waste, and ensuring uninterrupted operation.
The K2 Plus CFS simplifies these tasks, especially with its auto-refill and RFID detection capabilities, enhancing the overall user experience and output quality.
1. Connecting the CFS
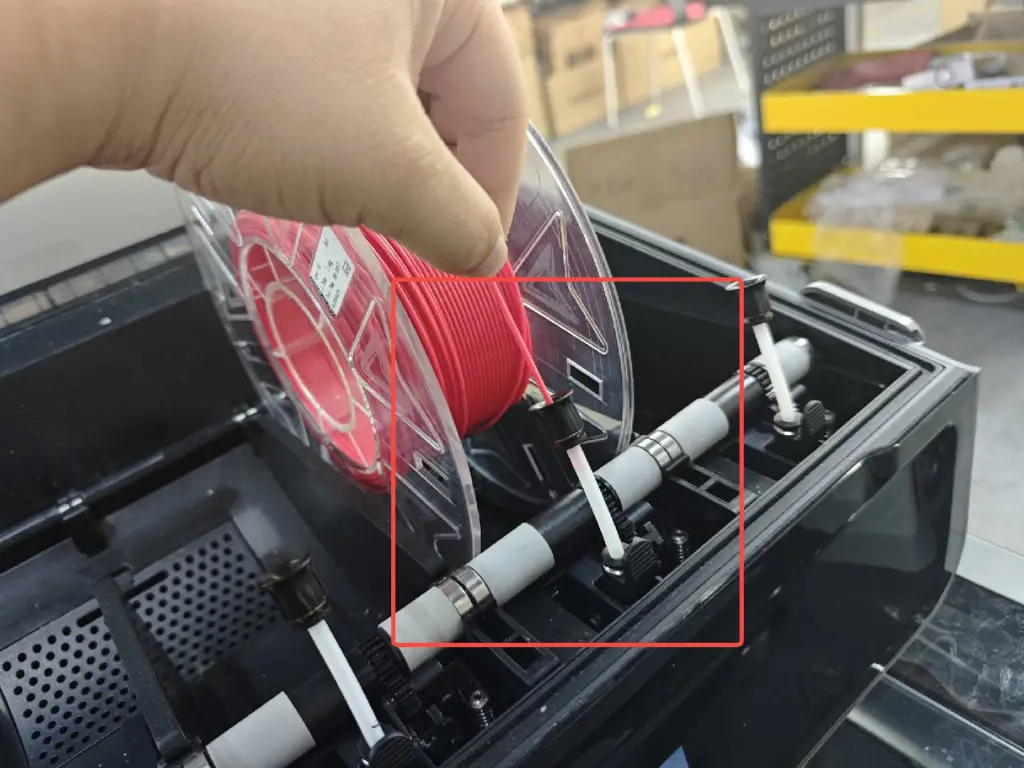
To initiate, place the filament spool in the CFS compartment and insert the filament end into the corresponding PTFE tube slot.
Push gently until resistance is felt, then release. The CFS indicator light will activate, confirming that the system has engaged auto-refill mode, which helps maintain even filament tension throughout printing.
Tip: If the indicator light does not illuminate, double-check that the filament is securely seated in the PTFE tube and reinsert if necessary.

2. Configuring Filament Information
Depending on whether the filament has RFID capability, the configuration process will vary:
Non-RFID Filament:
Non-RFID filament requires manual setup. After insertion, the printer interface will display a “?” symbol, indicating unidentified filament.
Click “Edit” on the filament page to input key details like brand, type, name, and color, and then save these settings to ensure accurate print parameters.
RFID Filament:
For RFID-enabled filament, the CFS will automatically read and display filament information if “Insertion Detection” is enabled, reducing the need for manual input. A “View” button will appear, allowing you to verify details directly.
3. Loading Filament
Select the desired filament slot on the filament page; the active slot will appear with a white outline.
Once selected, the CFS will begin loading the filament into the extruder. Monitor the nozzle to confirm smooth extrusion, then click “Extrude” once the button illuminates.
This function heats the nozzle and facilitates a secure filament feed.
Note: In case of irregular extrusion, pause and inspect for potential nozzle clogging or filament tangling.
4. Unloading Filament
To remove filament, simply click “Retract” on the filament page. This command moves the extruder to the designated position, allowing the printer to cut and retract the filament back into the CFS.
The nozzle will heat to the optimal temperature to ensure a clean removal, with the “Retract” button illuminating once complete, signaling that it’s safe to proceed with the next steps.
5. Replacing Filament: A Step-by-Step Guide
Before replacing filament, make sure the current print job is paused or stopped. Follow these steps to complete the process efficiently:
Check Filament Status: Verify if the old filament remains in the extruder.
- If Not Present: Directly remove the old filament from the CFS.
- If Present: Select “Retract” to fully pull back the filament into the CFS, then remove.
- Insert New Filament: Place the new filament in the CFS, guide it into the PTFE tube, and gently push until you feel resistance. Release to activate the CFS indicator light, which initiates auto-loading.
Note: For best results when switching filament types or colors, run a short test print after replacement to verify extrusion quality.
6. Updating New Filament Information
When using new filament, especially with non-RFID materials, updating the filament information is essential to ensure accurate material tracking and optimized print settings.
- Non-RFID Filament: If the interface still displays details from the previous filament, click “Edit” and enter the new information, including brand, type, and color.
- RFID Filament: RFID filaments automatically update in the system. A simple click on “View” verifies the details.
7. Extruding the New Filament
After selecting the new filament on the filament page, click “Extrude” to begin feeding the filament into the extruder.
As the nozzle heats, observe the extrusion to confirm smooth loading. Once the “Extrude” button reactivates, the filament is securely loaded and ready for printing.
8. Preparing to Print
With the new filament in place, your printer is primed to resume production. Following these steps not only ensures optimal filament management but also enhances print quality by preventing material inconsistencies.

Troubleshooting Common Issues
- CFS Indicator Light Not Activating: Check for a secure fit in the PTFE tube; reinsertion may be necessary.
- Nozzle Clogging During Extrusion: If extrusion appears irregular, pause the process to clear any blockage.
- Incorrect Filament Information Displayed: Always update filament details manually for non-RFID filaments to prevent misalignment in print settings.
Final Thoughts
The K2 Plus’s CFS offers a user-friendly and efficient filament management system that simplifies the loading, unloading, and replacement process, especially with RFID compatibility.
By following this guide, you can avoid common pitfalls and maximize the capabilities of your 3D printer, ensuring consistently high-quality prints.
FAQ
1. What should I do if the CFS indicator light does not turn on when inserting filament?
Answer: Ensure that the filament is correctly placed in the PTFE tube and pushed in until you feel slight resistance. If the light does not turn on, check if the filament is properly aligned. Ensure that the CFS system is powered on and connected to the printer.
2. How can I avoid filament clogging issues during extrusion?
Answer: Regularly clean the nozzle to prevent clogs caused by residual filament or debris. Before loading new filament, make sure the nozzle is at the correct temperature. Running a small purge (extrusion) after loading can help ensure smooth extrusion and prevent clogging.
3. Do I need to update filament information every time I load a new non-RFID filament?
Answer: Yes, for non-RFID filament, manually updating the filament information, including brand, type, and color, is essential. This step ensures the printer is set to the correct parameters for the filament, helping maintain print quality.
4. How can I tell if the filament has been fully loaded or unloaded?
Answer: During loading, check the nozzle for smooth extrusion to confirm the filament is fully loaded. When unloading, observe the extruder’s retraction process. Once completed, the CFS system will pull the filament back, and the “Retract” button will illuminate, indicating unloading is done.
5. What should I do if the filament is stuck in the extruder and won’t retract?
Answer: Heat the nozzle to the filament’s extrusion temperature to help release it. If it remains stuck, you may carefully pull it out manually. Avoid using excessive force, as this can damage the extruder or filament path.
6. Can I switch between different filament types easily using CFS?
Answer: Yes, the CFS system allows smooth switching between filament types. However, when changing between materials (e.g., from PLA to ABS), it’s recommended to run a nozzle purge to avoid cross-contamination and ensure proper extrusion.
7. Does the K2 Plus automatically adjust to different filament types when using RFID filament?
Answer: Yes, the CFS system automatically reads RFID filament details, applying the necessary settings if “Insertion Detection” is enabled. For non-RFID filament, the information must be entered manually.
8. How can I troubleshoot inconsistent extrusion during printing?
Answer: Inconsistent extrusion may be due to filament tangling, incorrect nozzle temperature, or partial clogs. Ensure the filament spool is positioned to avoid tangling, set the nozzle temperature to the filament’s recommended range, and regularly clean the nozzle.
9. What should I do if I need to pause a print and replace filament midway?
Answer: If you need to change filament during a paused print, ensure the printer is paused, then use the CFS “Retract” function to safely remove the current filament. After loading the new filament, resume printing once the nozzle is prepped and ready.
10. Can I use the CFS with non-standard or specialty filaments?
Answer: The K2 Plus CFS system supports various filaments, but for specialty filaments (such as flexible or composite types), check the manufacturer’s guidelines. Specialty filaments may require specific handling, temperature settings, or even an upgraded extruder.


Leave a Reply