Is your Creality Filament System (CFS) causing filament feeding issues? You’re not alone! Clogging is one of the most common challenges faced by 3D printing enthusiasts, but the good news is—it’s easy to fix.
With this step-by-step guide, you’ll have your CFS running smoothly again in no time. Grab your tools, and let’s get started!
- 16 COLORS TO ENHANCE YOUR CREATIVITY: The Creality Filament System (CFS) has a connection hub on the…
- SNAPSHOT SUPPORT IS ENABLED: the CFS is able to provide model support in different materials. It can…
- AUTOMATIC FILAMENT MAPPING: The CFS is programmed to communicate seamlessly using Creality 3D…
- AUTOMATIC FILAMENT SWITCHING AND RELAYS: The CFS is able to switch filaments smoothly and accurately…
- AUTOMATIC RUNOUT/TANGLE DETECTION: Sensors are used to monitor each filament reel. It will pause and…
Understanding the Problem
Symptom
The filament fails to feed properly through the Creality Filament System (CFS), interrupting printing operations.

Common Causes
| Cause | Effect | Analogy | Solution |
|---|---|---|---|
| Debris on Motor Gear | Blocks the motor gear, stopping smooth filament movement. | Like a jammed gear in a machine. | Clean the motor gear thoroughly. |
| Limit Switch Obstruction | Prevents the limit switch from functioning properly. | Like a stuck light switch. | Remove debris to restore function. |
| Loose Cable Connections | Disrupts system communication. | Like a faulty wire in a circuit. | Check and secure all cable connections. |
Step-by-Step Troubleshooting Guide
Step 1: Remove the Hub Module

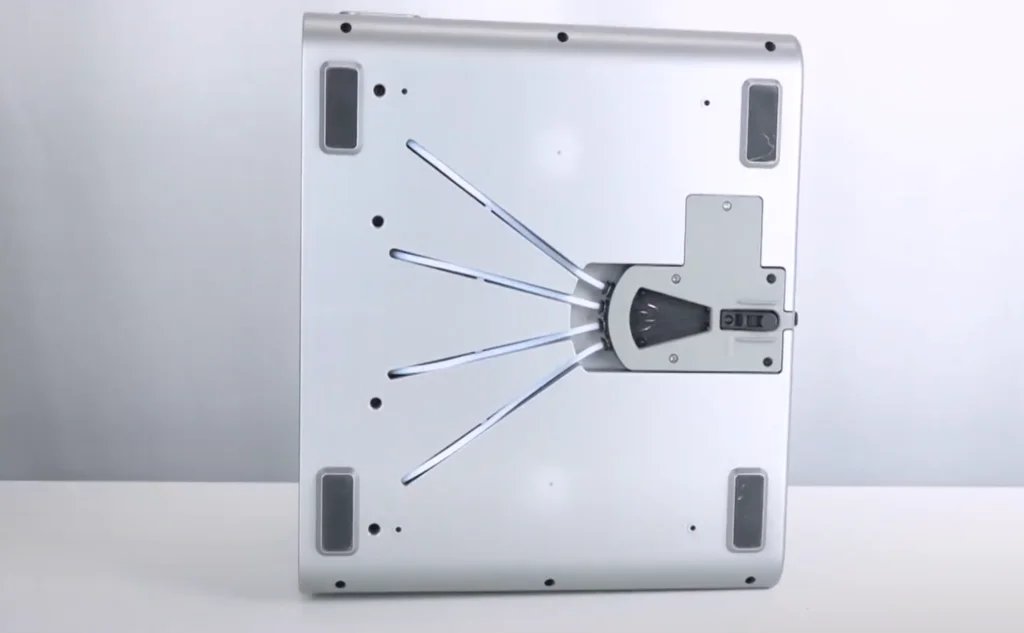
- Flip your printer upside down or place it on a stable surface for easier access.
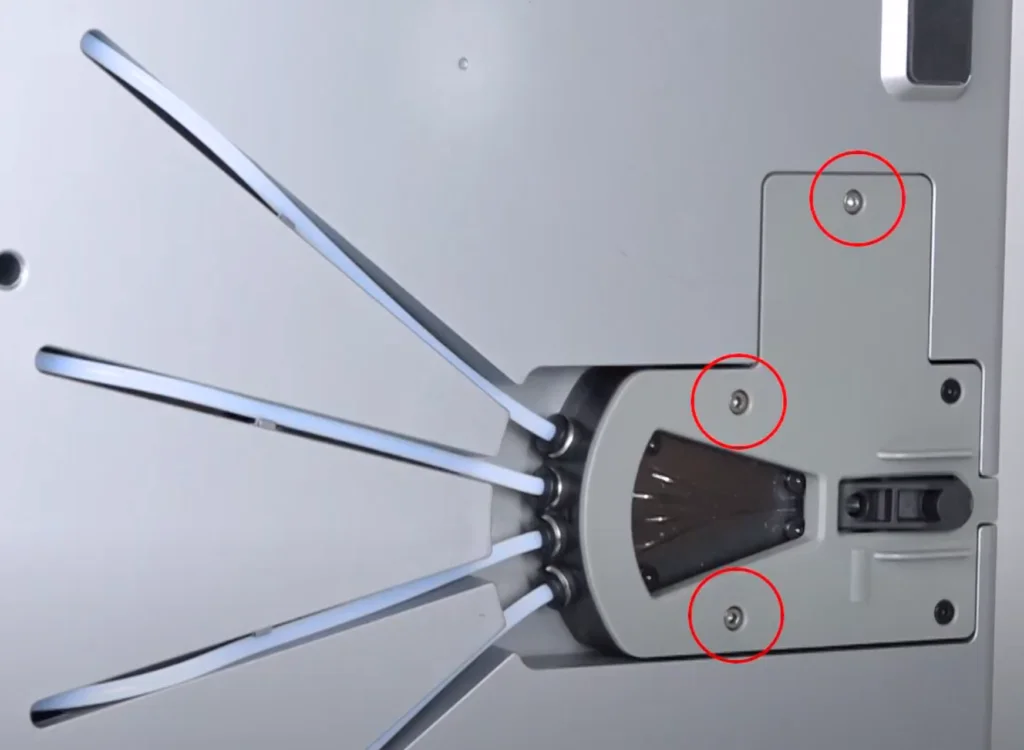
- Use a Phillips screwdriver to remove the three screws located at the bottom of the hub.
- Gently disconnect the four Teflon tubes by twisting and pulling them free.
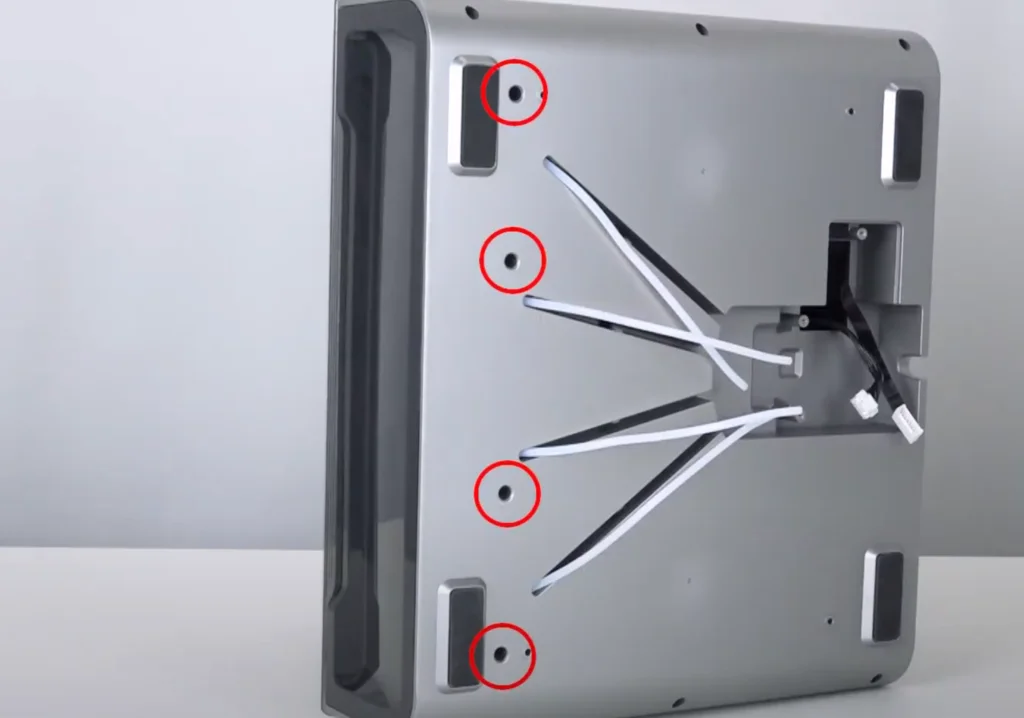
- Carefully lift out the hub module without pulling or stretching any wires.
Tips: Label the Teflon tubes if you’re unsure of their placement to make reassembly easier.
Warning: Avoid applying too much force when removing the module to prevent wire damage.
| Preview | Product | Rating | Price | |
|---|---|---|---|---|

| CRAFTSMAN Phillips Screwdriver, PH #2 X 4 IN, Acetate (CMHT65004) |
$5.59 | Buy on Amazon |

Step 2: Inspect the Cable Connection
- Locate the cable terminal inside the hub module.
- Inspect for any loose or disconnected wires.
- Use a multimeter (if available) to check for a secure connection and rule out short circuits.
| Preview | Product | Rating | Price | |
|---|---|---|---|---|

| AstroAI Digital Multimeter Tester 2000 Counts with DC AC Voltmeter and Ohm Volt Amp Meter; Measures… |
$16.99
$13.99 | Buy on Amazon |
How to Verify: Gently tug each wire to ensure it’s firmly attached. If any wires feel loose, reinsert them until you hear a click or feel resistance.
Step 3: Test the Motor Drive Whee

- Locate the motor drive wheel inside the hub assembly.
- Gently push the wheel with your finger. It should rotate freely without resistance.
If it feels stuck:
- Check for debris trapped underneath the wheel.
- Use a flashlight to spot hard-to-see fragments.
How to Verify: Once the wheel rotates smoothly, you’re ready to move to the next step.
Step 4: Clean the Motor Gear
- Take a soft-bristle brush or anti-static brush to gently remove debris from the gear.
- For stubborn particles, use compressed air or a toothpick (with caution).
- Avoid using sharp tools that might scratch or damage the gear surface.
How to Verify: After cleaning, manually rotate the gear. It should spin without obstruction or unusual noise.
Tip: Regularly clean the motor gear to prevent buildup that could lead to future clogging issues.
| Preview | Product | Rating | Price | |
|---|---|---|---|---|

| Selaurel Cleaning Brush Soft Bristle Brush Laundry Scrub Brush Clothes Underwear Shoes Scrubbing… |
$7.99 | Buy on Amazon |
Step 5: Inspect the Limit Switch
- Remove the transparent cover protecting the limit switch assembly.
- Test the movement of the four limit switches by pressing them gently to confirm they move freely.
Note: Use minimal pressure to avoid damaging these delicate components.
How to Verify: All switches should return to their original position without resistance or delay.
Step 6: Clean the Limit Switch Rails
- Take a small, soft brush to remove debris from the guide rails of the limit switches.
- Use a compressed air canister for harder-to-reach areas.
How to Verify: Gently press each switch again. If they move freely and return to position, cleaning is complete.
Tip: Consider using a compressed air canister for hard-to-reach areas.
- Removes dust, dirt and lint from hard-to-reach places
- You must be 18 years or older to purchase this product.
- Removes dust from hard-to-reach places. Deliver precise blasts of air with the included plastic extension tube.
- Contains bitterant to help discourage inhalant abuse.
Routine Maintenance Tips
Preventive maintenance is key to avoiding similar issues in the future. Follow these tips to keep your CFS in top condition:
- Clean Regularly: After every 10-15 prints, inspect and clean the motor gear, limit switches, and Teflon tubes.
- Check Connections: Before each use, confirm that all cables are securely connected.
- Use High-Quality Filament: Low-quality filament increases debris buildup. Stick to trusted brands for better results.
- Environment Matters: Keep your printer in a dust-free space and cover it when not in use.
Final Thoughts
Congratulations! By following these steps, you’ve tackled one of the most common CFS issues and restored your 3D printer’s functionality. Regular maintenance will help you avoid similar problems in the future.
Still have questions? Leave a comment below or reach out to Creality support.


Leave a Reply